
Its that time of the month again... the 24th day of each month when a batch of us food bloggers from the world over have pledged to pay homage to Carb-Devi, the goddess of all things delicious of starchy origin. This month, Aparna threw what seemed to be a sly curve ball at the lot of us, by listing Croissants as the bread to bake, and sure enough that feeble voice squeaking out warnings about butter & more 'Buttah' was quickly suppressed, tied down with culinary twine and dispatched to the 25th of the month! As Scarlett would say, "Tomorrow is another day!"
Yes, the prospect of making these is intimidating, it takes 3 days to prep the dough, roll out & bake, and then about 30 minutes to scarf them down. They are so wispy, light and flaky and if there is one thing I learnt from this experience, it has ruined me for store bought croissants. One batch make about 16 good sized pastries and given that the quality of the ingredients used is under ones control, it is well worth to make these beauties at home.The original version of the recipe we used is from www.finecooking.com. Aparna's directions were so perfect that I have taken the liberty of simply transferring it onto this page with some minor changes to reflect what I personally did while making the pastries.
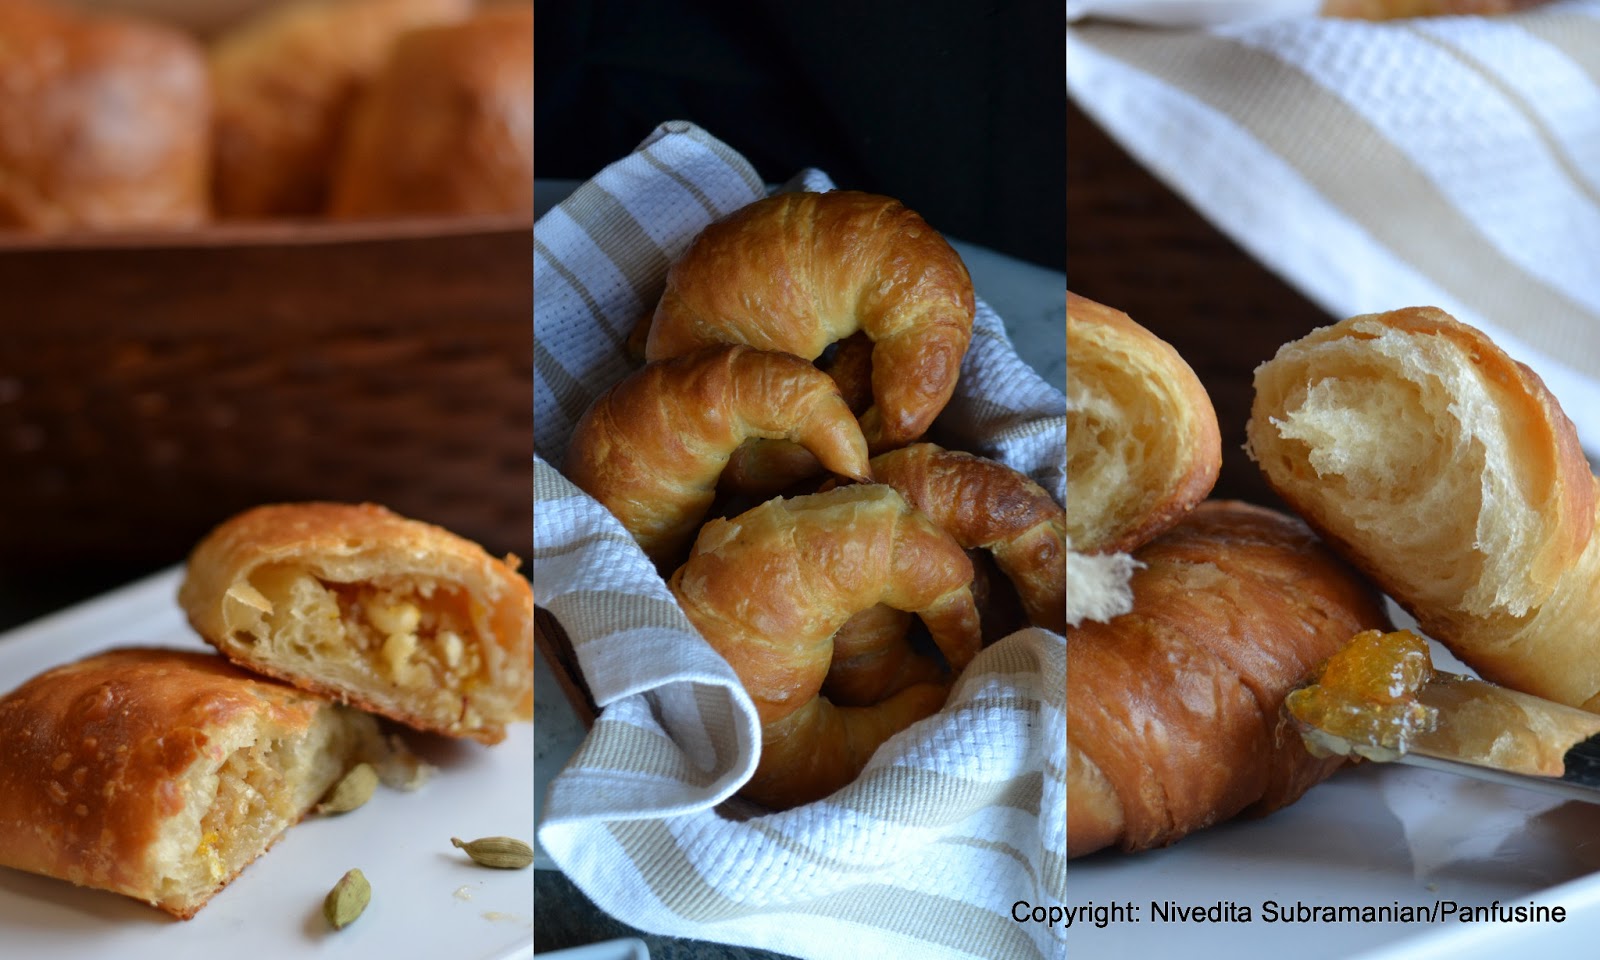
As divine as they are, it is virtually impossible to polish off 16 at one go, so feel free to divide the dough on day 3 and return one half of it to the refrigerator (if you plan to use it up within the next day or two, or freeze it for use at a later time). I opted to used a South Indian style filling on my second half,made with fresh coconut, jaggery and cardamom. This filling is a classic recipe called 'Thengai poornam' in Tamil. It is used for 'Modak', a sweet rice dumpling. I decided to christen this version 'Pain au poornam'! I'll post this recipe next week once the foundations of prepping the classic croissant dough have been established.
As divine as they are, it is virtually impossible to polish off 16 at one go, so feel free to divide the dough on day 3 and return one half of it to the refrigerator (if you plan to use it up within the next day or two, or freeze it for use at a later time). I opted to used a South Indian style filling on my second half,made with fresh coconut, jaggery and cardamom. This filling is a classic recipe called 'Thengai poornam' in Tamil. It is used for 'Modak', a sweet rice dumpling. I decided to christen this version 'Pain au poornam'! I'll post this recipe next week once the foundations of prepping the classic croissant dough have been established.
 |
| Pain au 'Poornam': Croissants with a coconut, jaggery & cardamom filling |
Classic Croissants:
Ingredients:
For
the dough:
4 cups all-purpose flour, and a little more
for dusting/ rolling out dough
1/2 cup plus 2 tbsp ice water
1/2 cup plus 2 tbsp cold milk
1/4 cup sugar
40gm soft/melted unsalted butter
1 tbsp + 1/2 tsp instant yeast
2 tsp salt
For
the butter layer:
250 gm cold unsalted butter (~2 sticks + 2 tablespoons)
1/4 cup of mix of milk & heavy cream to brush the rolled croissants
Method:
Day
1:
Make
the dough (and refrigerate overnight)
Combine all the ingredients for the dough
in the bowl of a stand mixer fitted with the dough hook. You can also use a food processor with the
plastic blade, or do this by hand.
Mix everything on low speed for 3 minutes,
scraping the sides of the mixing bowl once if necessary. Then mix further on
medium speed for 3 minutes. Lightly flour a 10-inch pie pan or a dinner plate. And place the ball of dough on this.

Gently shape the dough into a flat ball by
pressing it down before storing it in the fridge, this makes rolling out next
morning easier. Making a tight ball will strengthen the gluten which you do not
need. Lightly dust the top of the dough with flour and wrap well with plastic
so it doesn’t dry out. Refrigerate overnight.
Day
2:
Make
the butter layer
Cut out 2 pieces of waxed paper into 10” squares each.
Cut the cold butter sticks along their length into 1/2-inch-thick slabs. Arrange the pieces on one
piece of waxed paper so they form a 5- to 6-inch square. Trim the
butter further into pieces as required to fit the square. Cover with the other
piece of waxed paper.
Using a rolling pin, pound the butter with
light, even strokes. As the pieces begin to stick together, use more force.
Pound the butter until it flattens out evenly into a square that’s approximately
7-1/2”. Trim the edges of the butter to make a neat square.

Put the trimmings
on top of the square and pound them in lightly with the rolling pin.
Refrigerate this while you roll out the dough.
The 'Lamination' process (no pix for this step, since buttery, sticky fingers aren't exactly camera friendly)
Unwrap and lay the dough on a lightly
floured work surface. Roll it out to a 10-1/2-inch square, and brush off the
excess flour. Remove the butter out from the refrigerator —it should be cold but
pliable. If it isn’t refrigerate it till
it is. THis ensures that when you roll out the dough with the butter in it, It is neither soft enough to melt, nor hard enough to break. Unwrap the butter and
place it on the square of dough in the center, so that it forms a “diamond”
shape on the dough.

Fold one flap of dough over the butter
toward you, stretching it slightly so that the point just reaches the middle of
the butter square. Bring the opposite flap to the middle, slightly overlapping
the previous one. Similarly repeat with the other two so that the dough forms
an envelope around the butter. Lightly press the edges together to completely
seal the butter inside the dough to ensure the butter doesn’t escape when you
roll out the dough later.
Lightly flour the top and bottom of the
dough. With the rolling pin, firmly press along the dough uniformly to elongate
it slightly. Now begin rolling instead of pressing, focusing on lengthening
rather than widening the dough and keeping the edges straight.
Roll the dough into an 8” by 24” rectangle.
If the ends lose their square shape, gently reshape the corners with your
hands. Brush off the excess flour. Mark the dough lightly equally into three
along the long side. Using this as a guideline, pick up one short end of the
dough and fold 1/3rd of it back over the dough, so that 1/3rd
of the other end of dough is exposed. Now fold the 1/3rd exposed
dough over the folded side. Basically, the dough is folded like 3-fold letter
before it goes into an envelope (letter fold). Put the folded dough on a floured
baking sheet, cover with plastic wrap, and freeze for 15 to 20 minutes to relax
and chill the dough.
Repeat the rolling and folding, this time
rolling in the direction of the two open ends (from the shorter sides to
lengthen the longer sides) until the dough is about 8” by 24”. Once again fold
the dough in thirds, brushing off excess flour and turning under any rounded
edges or short ends with exposed or smeared layers. Cover once again with
plastic wrap and freeze for another 15 to 20 minutes.
Roll and fold the dough exactly in the same
way for the third time and put it baking sheet. Cover with plastic wrap,
tucking the plastic under all four sides and refrigerate overnight.

AS tempting as it may seem, resist the urge to laminate more than thrice, or else the butter will get so thinly distributed that the resulting pastry will not be optimized for flakiness.
Day
3:
Divide
the dough
The next day, unwrap and lightly flour the
top and bottom of the dough. Cut the dough along the longer side into halves.
Cover one half with plastic wrap and refrigerate it while working on the other
half. (or save it for the 'Panfusine' version with a traditional South Indian filling.)
“Wake up the dough up” by pressing firmly
along its length with the rolling pin. Don’t widen the dough but simply begin
to lengthen it with these first strokes. Slowly roll the dough into a long and
narrow strip, approximately 8” by 22”. If the dough sticks as you roll,
sprinkle with flour.
Once the dough is about half to two-thirds
of its final length, it may start to resist rolling and even shrink back. If
this happens, fold the dough in thirds, cover, and refrigerate for about 10
minutes; then unfold the dough and finish rolling.
Lift the dough an inch or so off the table
at its midpoint and allow it to shrink from both sides and prevent the dough
from shrinking when it’s cut. Check that there’s enough excess dough on either
end so that when you trim the edges to straighten them, you have a strip of dough
that is 20’ inches long. Now trim the edges so they’re straight.
If you’re good at “eyeballing” and cutting
the dough into triangles, then forget the measuring rule, marking and cutting
instructions. Otherwise, lay a measuring
rule or tape measure lengthwise along the top length of the dough. With a
knife, mark the top of the dough at 5-inch intervals along the length (there
will be 3 marks in all).

Now place the rule or tape measure along the bottom
length of the dough. Make a mark 2-1/2 inches in from the end of the dough.
Make marks at 5-inch intervals from this point all along the bottom of the
dough. You’ll have 4 marks that fall halfway between the marks at the top.
Make diagonal cuts by positioning the
yardstick at the top corner and the first bottom mark. Use a pizza wheel/ pie
wheel or a bench scraper and cut the dough along this line which connects each
top mark to the next bottom mark and then back to the next top mark and so on.
This way you will have 7 triangles and a scrap of dough at each end.

Shape
the croissants
Now work with one piece of triangular dough
at a time. Using your rolling pin, very lightly roll (do not make it thin but
only stretch it slightly) the triangle to stretch it a little, until it is
about 10” long. This will give your croissants height and layers. You can
stretch it by hand too, but if you don’t have the practise, your stretching
could be uneven.
Using a sharp small knife, make a 1/2- to
3/4-inch-long notch in the centre of the short side of each triangle. The notch
helps the rolled croissant curl into a crescent.
Place the triangle on the work surface with
the notched side closest to you. With one hand on each side of the notch, begin
to roll the dough away from you, towards the pointed end.
Flare your hands outward as you roll so
that the notched “legs” become longer. Roll the triangle tight enough but not
too tight to compress it, until you reach the “pointy” end which should be
under the croissant.

Now bend the two legs towards you to form a
tight crescent shape and gently press the tips of the legs together (they’ll
come apart while proofing but keep their crescent shape).
Shape all the triangles like this into
croissants and place them on a greased or parchment lined baking sheet leaving
as much space between them as they will rise quite a bit.
Proof
the croissants
Brush the croissants with milk (or a mix of
milk and cream). If you use eggs, make an egg wash by whisking one egg with 1
tsp water in a small bowl until very smooth. Lightly brush this on each
croissant.
Refrigerate the remaining milk/ milk+cream
(or egg wash) for brushing the croissants again later. Place the croissants in
a cool and draft-free place (the butter should not melt) for proofing/ rising
for about 1 1/2 to 2 hours. I found that covering the croissants with plastic wrap & placing it in an oven with the light on worked great.

They might
need longer than 2 hours to proof, maybe as much as 3 hours, so make sure to
let croissants take the time to proof. The croissants will be distinctly larger
but not doubled in size. They’re ready if you can see the layers of dough from
the side, and if you lightly shake the sheets, the croissants will wiggle.
Bake
the croissants
Just before the croissants are fully
proofed, pre-heat your oven to 200C (400F) in a convection oven or 220C (425F)
in a regular oven. Brush the croissants with milk/ milk+cream (or egg wash) a
second time, and place your baking sheets on the top and lower thirds of your
oven (if regular) or bake one tray at a time in the convection oven.
Bake them for about 15 to 20 minutes till
they’re done and golden brown on top and just beginning to brown at the sides.
In a regular oven, remember to turn your baking sheets halfway through. If they
seem to be darkening too quickly during
baking, lower the oven temperature by 10C (25F). Cool the croissants on the
baking sheets on racks.

Serve warm. This recipe makes 8
croissants. I served them up warm with a side of home made Mayer lemon marmalade.

As i said earlier, I'll post the recipe for filled version next week, but here's a sneak peek:

Bon appetit!

Beautifully written post and loved your bake...Liked the filling idea too...
ReplyDeleteU take beautiful pictures...The filling reminds me of Gujhiyas made during Holi !!
ReplyDeleteI cannot but say I bow to your innovation! Truly pan fusined!
ReplyDeleteThose Pain au Poornams stole my heart. You are a fusionista and a GREAT one at that! Loved the story telling too.
ReplyDeleteawesome photos nivi !
ReplyDeleteI really like your coconut/jaggery/cardamom filling! Terrific challenge!
ReplyDeleteFrom the time I was a little girl, I've loved the modak filling. So much, that I would eat bowlfuls of it, even before the modaks were made - much to my mom's irritation :) I can just imagine how absolutely phenomenal these buttery, flaky croissants with the modak filling must've tasted!
ReplyDeleteFusionista?? That sounds soo cool, Thanks Ansh, I'm honored!
ReplyDeletethanks Reshmi!
ReplyDeleteLove Gujhiya's! now you've got me craving them with Holi round the corner!
ReplyDeleteThanks Lata!
ReplyDeleteThanks Aparna!
ReplyDeleteThanks Lynne!
ReplyDeleteThanks Sonya, Planning to make a second batch this weekend, A keeper in my book for sure!
ReplyDeleteI love all your pictures and I especially love the closeup ones. It's just not fair to my fingers to be hit before realizing that I'm reaching through my computer screen for the croissants. It's that tempting. Good one Niv!
ReplyDeleteThank you Jayanthi, your words mean a lot to me, appreciate it!
ReplyDeleteWOW!!! Beautiful pictures!! Loved the Pain au Pooranam idea! :D
ReplyDelete